
When creating a simple 3D character in Max, you don't need to get too technical with the way you rig the character for animation. Unity agrees with the Biped system, so by introducing my Lawrence Tech Game Art students (or you, trusty blogosphere adventurer) to rigging with the system, it gives you a good foundation before taking things further on your own, or in future courses. I want to break things down, step-by-step, more-or-less, sans YouTube, and outline what boxes need to be checked, the process I use for quickly rigging characters, and the methodology behind it all.

Start by generating the Biped. In the create Tab, select Systems (1), then select Biped (2). In the viewport, click and move your mouse to create the Biped just like you would a Box. Easy, right?

Everyone is going to have a different character, I imagine. Maybe your character is a righteous knight, or a goofy little robot with a giant head. Either way, you need to scale the Biped's bones to fit the proportions of your character. To do this, in the Motion Panel with any part of the Biped selected, click on Figure Mode (A). The stick man button!

Imperative: using the Track Selection rollout's Movement tools (A), drag your Biped into your character as shown. Line up the pelvis with your character's pelvis. Don't worry about the scaling or the proportions just yet. By using the Track Selection movement, we automatically selected the Biped's BIP object, which is acting as the parent to the entire skeleton. If that parent moves, as you will see, all of the children bones will follow. Good kids.

With Figure Mode activated, you can then scale and adjust individual bones to whatever size they need to be. Pro Tip: With the Biped lined up in your character's pelvis, begin scaling the pelvis bone so your hip joints are in the appropriate spot. Utilize both front, side, and perspective views to properly align your joints. Continue working your way outward. Don't go scaling symmetrical limbs just yet, though!

If you already scaled the Blue side of the Biped, or vice versa, we can mirror the Blue side over to the Green side with a quick 3 click step. After selecting the appropriate bones you want to mirror, click Create Collection (1), click Copy Posture (2), then click Past Posture Opposite (3). Boom. Mirror'd. Once you've scaled everything appropriately, mirror'd symmetrical limbs and made sure the thing fits inside your mesh, your set to move on to the next step. That Skin Modifier!
Popular Student Question: "Do my bones have to fill the mesh?" or "Does it matter how big my bones are?"
Answer: No. It does have an impact in ways that aren't necessarily relevant with the approach I'm outlining here, though. Just try not to make your bones enormous. Technically speaking, the term "bones" isn't limited to what your Biped is composed of. Bones can be lines, cubes, or even cylinders.

Now, with your Character mesh selected, add the Skin Modifier (1) to your modifier stack. Next, click the Add (2) button, and select the bones that will impact your character. In the above example, my character is broken down into three individual objects. The head is only influenced by my head bone, so adding anything else is pretty pointless. For the character's body, however, I use the thigh/calf bones, the pelvis, and the spine bones. That leaves arm joints for the separate arm objects.
After bones are added, select the big Edit Envelopes Button. Make sure the select Vertices (3) check box is checked.
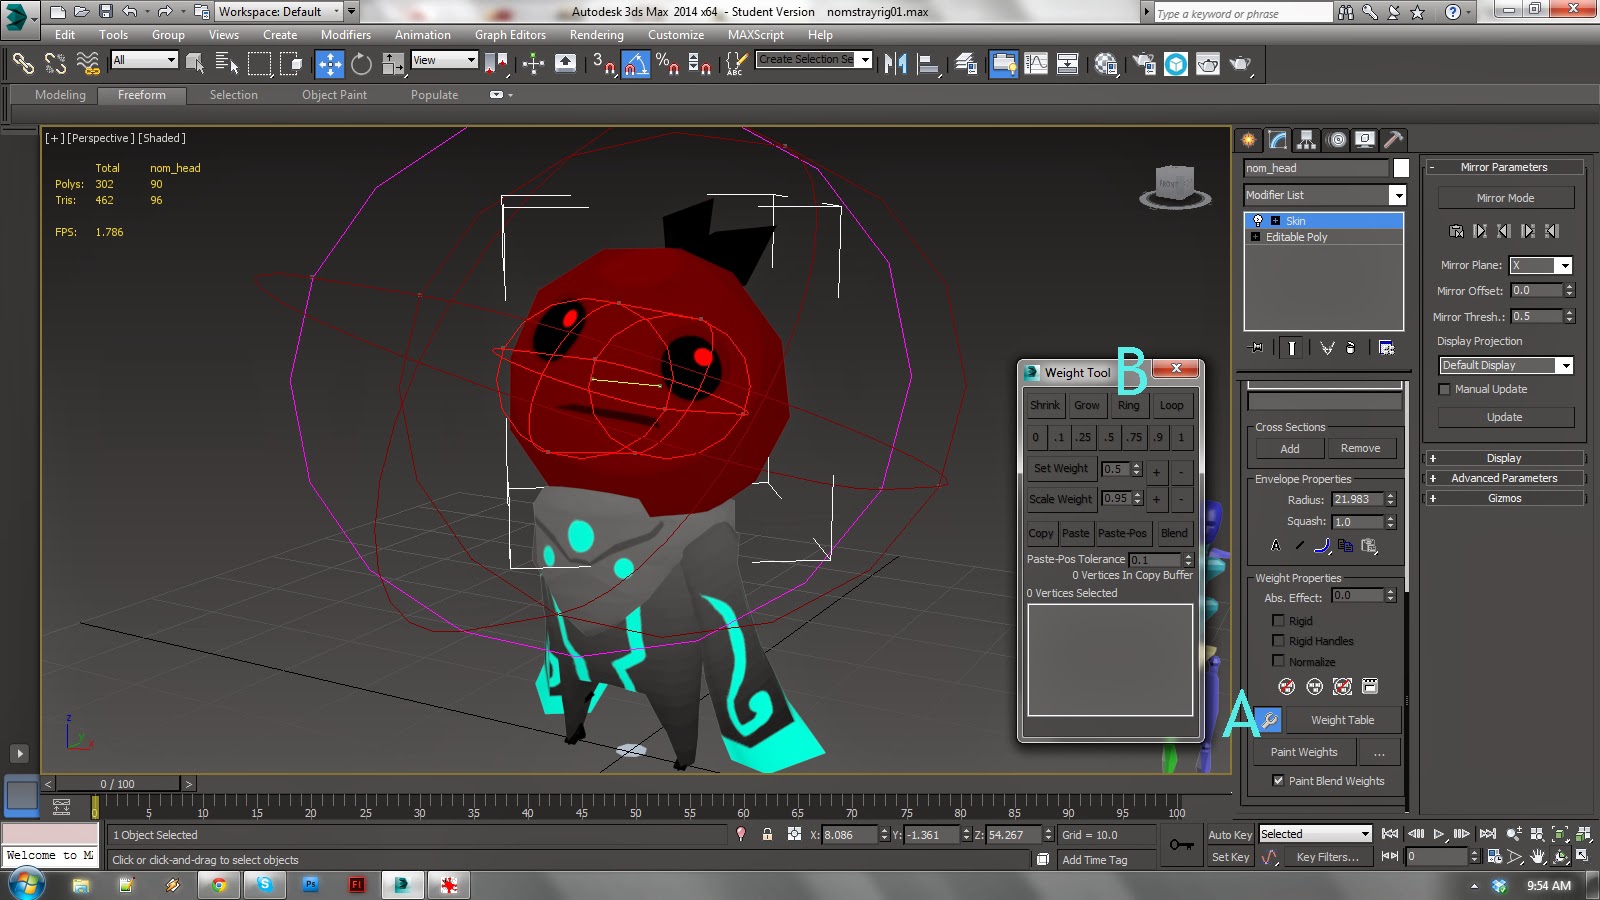
In the command Panel, scroll down and click on the Wrench icon. This will bring up your Weight Tool dialog box.

The Weight Tool will allow you to see how much influence each bone has over individual vertices. In the example above, the entire head is selected. Tiny white boxes highlight each selected vertex. In the Weight Tool window, we can see that each vert has 1.000 influence with the Head bone. If multiple bones need to influence the vert (which is typical for knees, elbows, hips, shoulders, etc.), the vertex can divide that 1.000 among them. Note that every vertex needs a sum of 1, so you'll see combinations that vary.

Technical vernacular aside, here is the workflow you'll be using. Starting with the Pelvis, you will select each bone in the Skin modifier's bone list (A). As in the example above, the mesh (if it isn't in see-through mode) should light up to show you a heat map of the bone's influences over the mesh's verts. Red is 1. Blue is .1. Warmer means more influence, cooler means less. Gray means 0.
Then, in the viewport, you will select verts that may need adjustment (B). Utilizing the Weight Tool (C), you will assign the necessary amount of influence by clicking the numbered buttons.

This part differs for each bone, but typically you'll want the vertex loops around each bone to have 1.000 influence with it. If we're talking elbows, knees, shoulders and so on, you'll have to fiddle with individual vert weights to make sure bends and flexes are good.

To efficiently check on your deformation, I suggest animating your biped a bit. On frame 0, stick with your initial bind pose. On frames 5 and 10, add in some rotation and bending with the arms, legs, and spine. Back in your Edit Envelopes and Weight adjustment mode, you can then simply scrub through your timeline to see the deformation in-action.
In the example the leg on the left is bending nicely. The yellow verts on the front of the knee are influenced by both the thigh and calf, 50/50. Or .5 for each bone. The leg on the right isn't so smooth looking. It has yet to be given proper influences and is fairly jagged, but will be fixed!
I'll update this a bit as needed. Hope this helps!
No comments:
Post a Comment